Portable Pocket Amps
Portable Pocket Amps
The following instructions outline the use of the PA2V2. If you have any questions please let me know by sending an email to Gary@Electric-Avenues.com, I am always happy to help.
The PA2V2 requires two AA sized NiMH rechargeable batteries (1.2 Volts each). Alkaline and Lithium batteries should not be used.
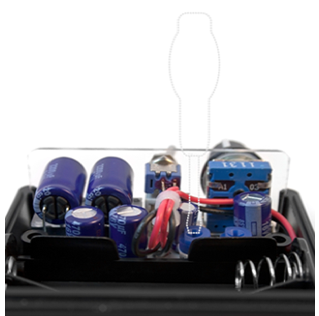
Removing the two screws under the amplifier will enable the lid to be opened so the batteries can be installed. Care should be taken not to over-tighten the screws when closing the amp back up.
The batteries should always be installed, even if the amp is mainly used with the USB AC adapter.
By USB charging cable:
When the USB charging cord is plugged in it will begin to recharge the batteries (whether the amp is turned on or off). It can be plugged into the USB port on a computer or an AC-to-USB adapter will also work great. There is no indicator light to show when charging is complete but when the batteries get full the rate slows to keep them topped up. Usually a 12 to 16 hour charge is enough.
The charging rate is slow to maximize the lifetime of the batteries. They could give 1000 cycles which would be about 3-4 years of regular use before needing replacement.
By an AC adapter:
An AC adapter with the follow specifications can also be used:
Output Voltage: 3 Volts DC
Output Current: Anything 200 milliamps (200mA) or greater
Plug type: A 2.5mm male mono plug with a negative tip, and positive barrel.
When charging with an AC adapter, the same will apply. It will begin to recharge the batteries and then slow down to keep them in a state of being topped up. A typical charge time is between 12 to 16 hours.
Instead of being plugged directly into the source, your headphones can now plug into the PA2V2’s output jack.
A connection cord can be used to bring a stereo audio signal into the amp’s 3.5mm (1/8″) input jack.
After turning on the power, you can either use the amp’s knob to adjust the volume, or use the volume controls on the source.
The source should not be set to very low (below 10%) or very high (above 90%) volumes to avoid areas of increased background noise and distortion. If the source is a fixed line out signal then that is fine.
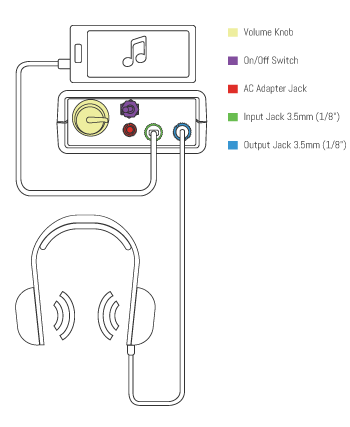
Inside the amp, behind the volume knob, you’ll find two small blue screws. These can be used to adjust the gain level. One screw is for each channel and a clockwise rotation will increase the gain. In-ear phones will need a low gain setting, full sized headphones can use a medium setting, with a high setting being used for high impedances (greater than 120 ohms).
An optimum gain setting happens when the screws are set such that the amp’s main knob can be turned to full and the music coming out is just before the point where it would start to sound distorted if the volume were turned up higher. The screws can be adjusted as you’re listening to find this setting. Avoid turning the screws all the way to full.
The amp’s volume knob is not permanently glued on so during shipment (or your own use) it may somehow become stumped down. This can cause the knob to rub against a nut below with friction instead of rotating smoothly. If this happens the knob can be gently pried back up from underneath with the help of a coin.